How To Make Multiple Clipping Path In Photoshop: 9 Simple Steps to Follow
Multi-clipping path is an advanced image editing technique to isolate several elements of an object or image to do different types of image manipulation. From ecommerce businesses to photography studios to advertising agencies, a wide variety of businesses and individuals need multiple clipping path services. If you are a bit curious about learning how to make multiple clipping paths in Photoshop, this article will give you a complete idea of this. We will discuss the entire process step by step.
What Is A Multiple Clipping Path?
Multiple clipping path is an image editing technique where you form several independent vector paths to clip out various elements or parts of an object or product. Graphic designers mainly use the Photoshop pen tool to make multi clipping paths.
This non-destructive editing technique allows you to make complex selections and manipulate various parts of an object or image independently.
For instance, multiple clipping paths help show the product color variations of a product line or perform color corrections of a multi-stone necklace.
Clothing, fashion, jewelry, furniture, footwear, and many other product images need multiple clipping path services to create a high-quality, professional appearance.
Different Types of Multiple Clipping Paths
There are generally four types of multi-clipping path services: basic, simple, medium, and complex. Their complexity varies from one to another.
01. Basic Multiple Clipping Path
Basic multi-clipping paths are suitable for images with several different elements. Each element has clear and straight edges. They are easy to isolate. For instance:
- Eyeglasses: The lenses and frame of the eyewear
- Furniture: Various parts of the furniture
- Electronics: The screen and other body parts
- Books: A stack of books in multiple colors
02. Simple Multiple Clipping Path
Simple multi-clipping paths are ideal for images with slightly more complex objects. They generally have a few curved edges. These types of objects may vary in color or texture. You may need to create separate clipping paths to cover the internal and external parts of a single object. For instance:
- Tableware items: A group of plates, cutlery, or glassware
- Apparel: A few folded, stacked shirts or a group of different colored jackets
- Jewelry: Gemstone rings, or charm bracelets
- Footwear: Crocs-style shoes with vent holes
03. Medium Multiple Clipping Path
Medium multi-clipping paths are suitable for images with several holes or designs. Images with multiple objects in different colors or different subjects need medium multiple clipping path services. For instance:
- Complete Outfit: A man or woman wearing a shirt, pants, and other accessories
- Footwear: Shoes with customized laces, zippers, or soles
- Clothing: Garments with tricky parts like buttons, zippers, or buckles
04. Complex multiple Clipping Path
Complex multi-clipping path services are needed for images with super complex objects. They contain both straight and curved edges. You have to utilize several advanced editing techniques to isolate the object completely. For instance:
- Complex Objects: Baby strollers, bicycles, or fishing rods with reels
- Jewelry: Chandelier earrings or stone-embedded necklaces with chains
- Furniture: Bookshelves with geometric openings or headboards with ornamental cutouts
How To Make Multiple Clipping Path In Photoshop?
Adobe Photoshop is one of the most powerful industry-standard photo editing software programs for editing and image manipulation. You can use this tool to create paths that are mainly vector-based line drawings. These paths are used for various purposes, like masking, selection, shapes, etc.
The following are the step by step guidelines to create multiple clipping paths using Adobe Photoshop.
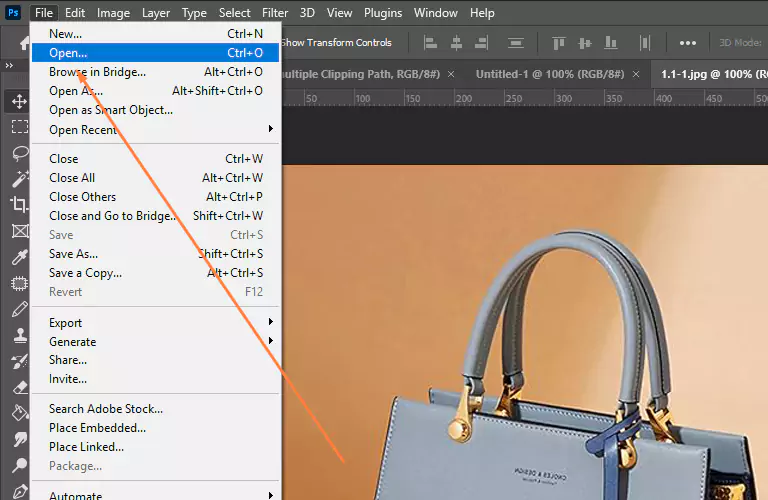
Step 1: Import The Photo
Launch the Photoshop software. Navigate to the menu bar section and Select File > Open. Tap on the photo you want to edit. Or use the drag-and-drop technique to open the image directly.
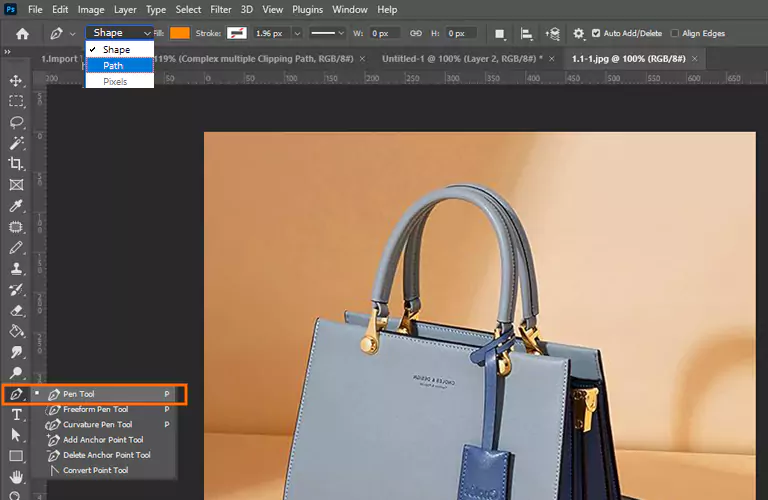
Step 2: Select the Pen Tool
Navigate to the toolbar area from the left side of the Photoshop software. Select the Photoshop Pen tool from the middle area of the toolbar that looks like a fountain pen nib. Or simply hit the ‘P’ key on the keyboard.
Step 3: Choose the Path Option
Once you select the Photoshop pen tool, navigate below the Options Bar area and choose the “Path” option. It enables you to draw a vector path. Don’t select the “Shape” option.
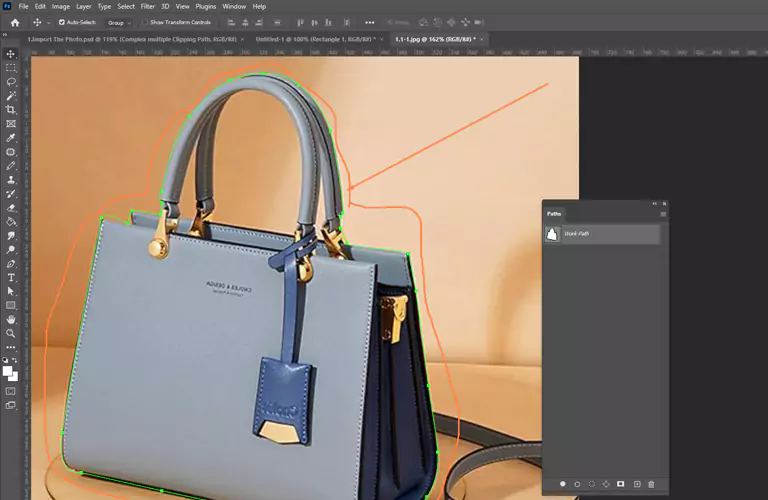
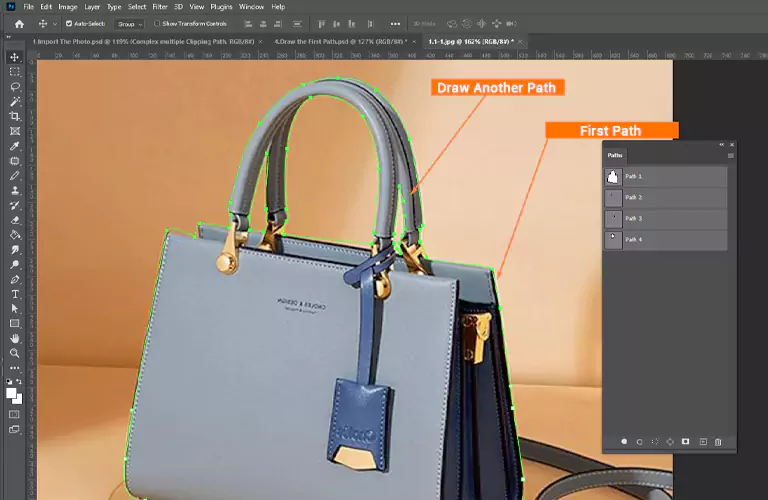
Step 4: Draw the First Path
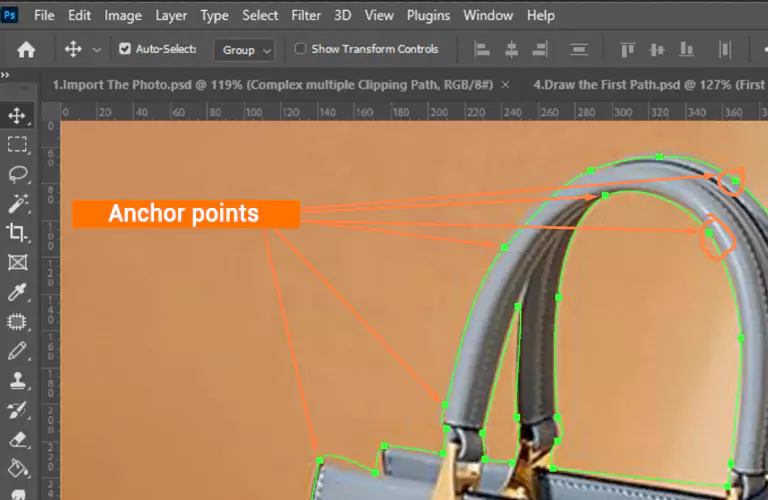
Zoom in on the image appropriately. Target the particular area where you want to make the first clipping path. Tap on the object carefully to place the first anchor point.
Move along the object to add more anchor points until the entire object is covered. Be careful while placing anchor points in curved areas. They must look natural and accurate. Poor placement may cause jagged or uneven curves. Finally, bring your mouse cursor to the first anchor point to close the path.
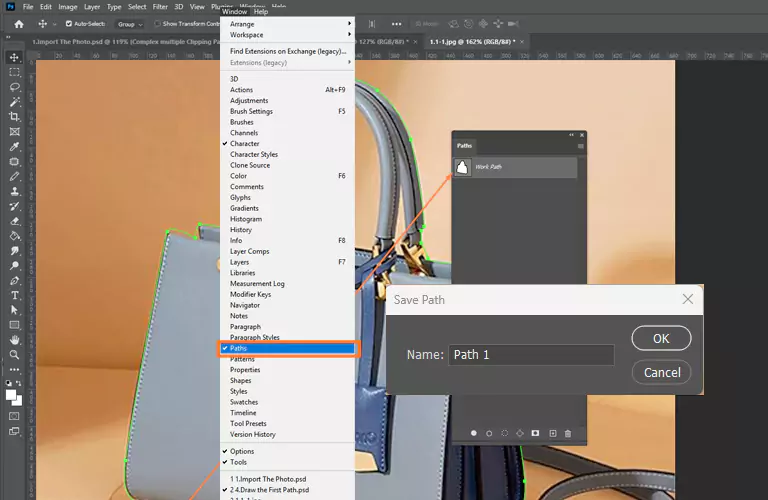
Step 5: Open the Path Palette
After creating the first clipping path, navigate to the right panel area. If nothing is visible, tap on the Window > Path. The Path Palette section will be visible from the right side. It allows you to create and manage vector paths.
Step 6: Save the Path
Navigate to the path panel and double-click on the “Work Path.” Add a clear and concise name for the vector path. Click OK to save the path.
Step 7: Draw Another Path
Your image may have multiple subjects. They require a separate clipping path. To draw the next clipping path, right-click on the Path Palette section and select the “New Path” option. Now, follow the same steps mentioned earlier to create as many paths as needed.
Step 8: Refine Your Paths
Each clipping path is drawn within the Paths panel. After creating all the paths for covering all the elements of the subject, use the Direct Selection Tool (A) to modify a vector path’s anchor points and curves.
Step 9: Activate the Clipping Path
Once you adjust the paths, move to Paths panel section. Choose your preferred path and click on the panel menu icon. When dropdown options pop up, tap on the “Clipping Path” icon.
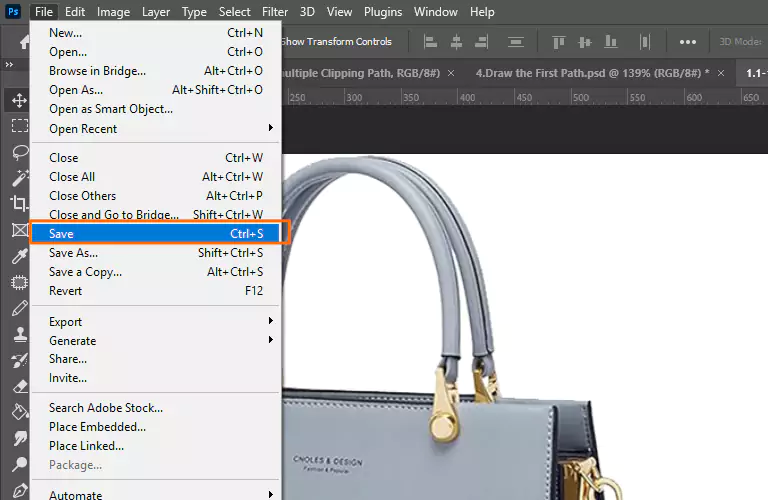
A new dialog box will pop up. Select your desired vector path from the list. Tap on the OK option. Save the file in PSD or TIFF format to preserve the clipping paths. Now, everything will be visible with transparent backgrounds.
How to Merge Paths in Adobe Photoshop?
- Move to the menu bar section and choose Window > Paths to open the Paths panel.
- Select the Path Selection tool from the toolbar to merge all the paths. Make sure to keep the paths on the same layer.
- Navigate to the Options Bar area and choose the “Path Operations” option from the dropdown list.
- Finally, select the “Merge Shape Components” option from the layout menu.
How to Create Parallel Diagonal Lines in Adobe Photoshop?
- Move to the toolbar area and tap on the Shape tool option. When the flyout menu is visible, select the Line Tool.
- Click and drag to draw a line on your preferred area. Hold the Shift button to create a perfectly straight line.
- Navigate to the Options Bar area, adjust the stroke color and width of the line.
- Duplicate the layer. Press the “V” key to use the Move tool. Hold the Shift button and drag to create another copy line parallel to the original line.
- Adjust the distance between the lines based on your preference. Follow the same approach to add more parallel lines.
- Press the Enter button to finish the parallel lines.
How to Create a Custom Path Shape in Adobe Photoshop?
- Move to the Toolbar section and select the Photoshop Pen tool. Choose the Path option from the Option Bar.
- Click on the canvas and draw a path.
- Select the Direct Selection tool (A) from the toolbar. Adjust the anchor points and curves of the vector path.
- After creating the vector path, click on the initial anchor point to complete the path.
- Click Edit > Define Custom Shape from the menubar.
- Add a name to the new custom shape. Click “OK” to save the shape.
- Move to the toolbar area and choose the Custom Shape tool from the shape tools. Select the shape option from the options bar area.
- Draw your customized shape in your preferred color or style.
How To Choose A Multiple Clipping Path Service Provider?
- Choose a company that has at least 5-10 years of experience in the photo editing industry.
- Check their portfolio to understand their editing skills and expertise on multiple clipping paths.
- Consider whether they can submit a large number of images on time.
- Their pricing structure should be clear and reasonable compared to the competitors. It must portray the value they will add.
- Utilize their free trial option. Submit 1-2 tough images to assess their photo editing quality.
- Browse social media to learn more about the company’s reputation and its commitment to delivering high-quality images.
Frequently Asked Questions
What is the best way to create multiple clipping paths?
The Photoshop Pen Tool is the best choice for creating multiple clipping paths. It gives you more control to draw accurate, detailed selections and cutouts.
How do you manage multiple clipping paths?
Professional graphic designers use the Direct selection tool to adjust individual anchor points and path segments of shapes and paths.
When to use multiple clipping paths?
Images with several objects, complex shapes, different colors, or separate parts need multi-clipping path services.
When not to use multiple clipping paths?
It is better not to use multiple clipping paths for transparent and furry objects. Instead, you should use image masking services for such objects.
How much do multi clipping path services cost?
It depends on the image complexity, number of paths, number of images, and other factors. But a standard multi-clipping path costs around $0.99$/Image.
Are multi clipping paths used for editing e-commerce product photography?
Yes, multiple clipping path services are used for e-commerce product images to remove background and retouch images professionally.
Conclusion
Whether it is background removal, color correction, or advanced retouching, multi clipping paths are an effective technique for achieving professional-level photo editing. This non-destructive technique can provide high-quality results. Avoid rasterizing clipping paths as it can cause a loss of scalability and editability. We have already outlined how to make multiple clipping path in Photoshop. If you don’t have enough time to edit on your own, hire a multi clipping path service provider to focus on your core business.


