Top Professional Tricks and Tips While Clipping Path on Images You Must Know
Clipping path is an important part of professional photo editing. You must have a proper idea of how to place anchor points and curves perfectly. Does your product image have any jagged curves or rough edges? Creating a clipping path may look simple. But accuracy is the key to achieving a pixel-perfect cutout. A streamlined vector outlining process is a must to create images with smooth edges and minimal artifacts. This article shares pro-level tricks and tips while clipping path on images.
01. Use the Right Tool for Different Edges
Not all product images have the same type of edges. Some have hard edges; some soft, complex, or irregular edges. Hence, you have to use different tools based on the edge type for accurate and efficient results.
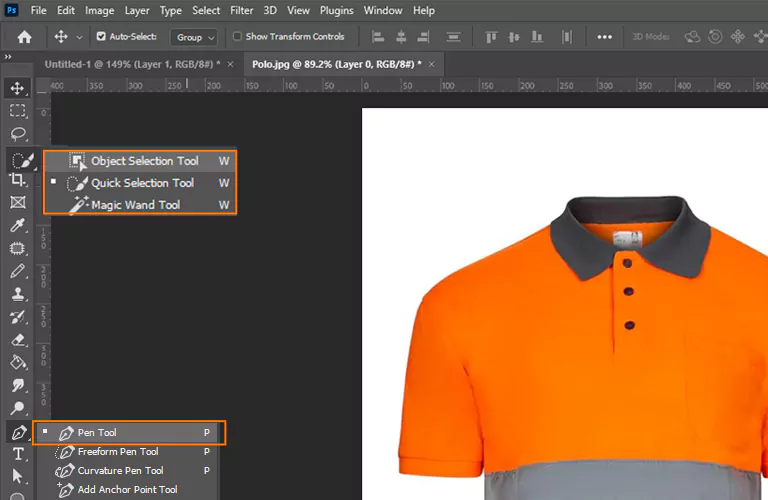
Pen Tool
Pen tool is the best choice for creating accurate and more controlled clipping paths. You can draw vector paths with sharp corners and smooth, curved lines. It is especially important for images with complicated shapes and fine details.
Quick Selection Tool
Quick selection tool works better for images with high-contrast edges. It offers rapid, approximate selections of objects. For example, this tool works great for objects like hair or fur to make the initial selection. Then, combine it with other tools and techniques for natural-looking results.
Magic Wand Tool
This versatile tool is appropriate for quick, automatic selections. The Magic wand tool is a better choice for images with sharp edges and similar color and tone.
02. Minimum Anchor Points
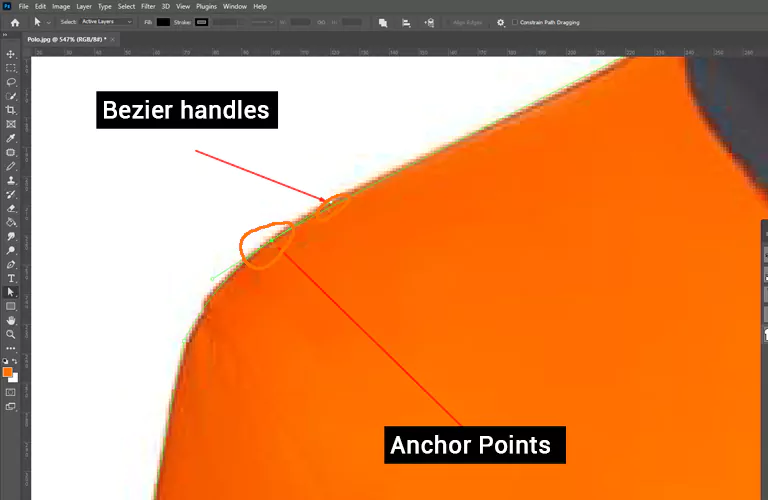
Clipping paths require adjustment after defining the outline. Plus, you have to smooth the curve. Too many anchor points make this task difficult. Aim for as few anchor points as possible.
Extend the Bézier handles about one-third of the way to the next point. It gives you better control over the curve. You won’t have to worry about creating too sharp or flat arcs.
Enjoy these benefits of using fewer anchor points while creating clipping paths:
- Smaller file
- Easy to refine the path
- Simple to avoid jagged or uneven paths
03. Adjust the Drawn Clipping Paths
Do you create a clipping path every time if the path is not accurate? Adjusting the drawn vector path is better to achieve improved accuracy.
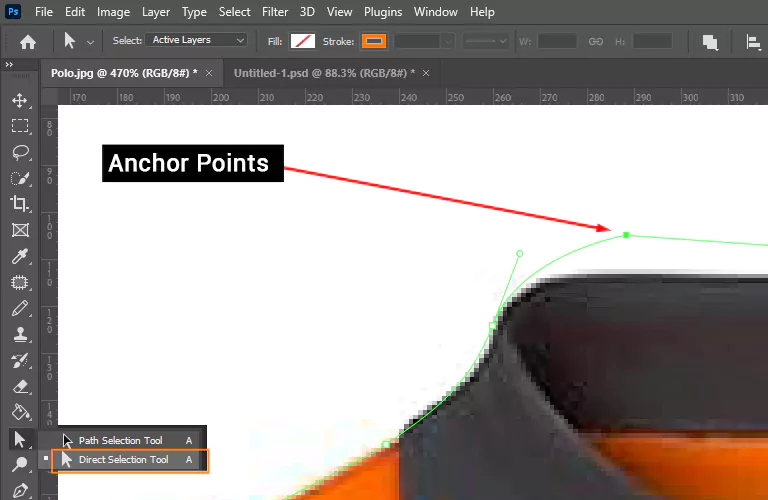
One of the best tools is the Direct Selection Tool. It enables you to modify specific path segments in a path.
Simply press the “A” key to activate the Direct Selection Tool. Carefully click and drag specific anchor points to reshape the drawn path.
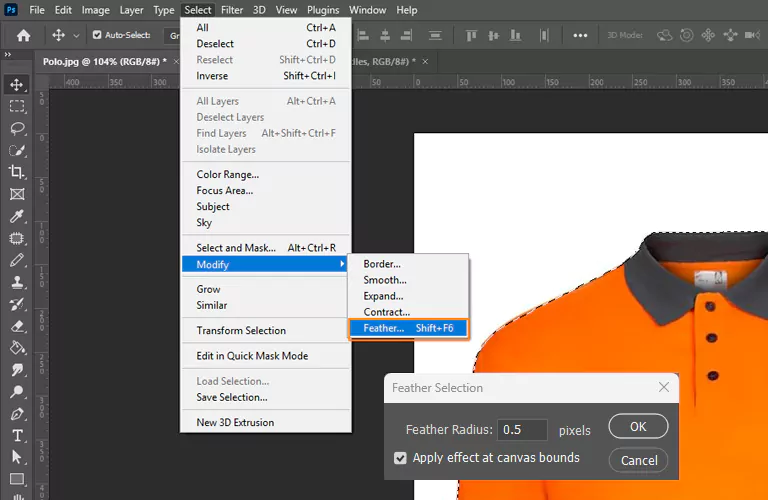
04. Apply a Subtle Feather
Some images have multiple subjects. A smooth transition is a must to make all the elements, including colors, shapes, and objects, blend seamlessly.
In such cases, avoid drawing a vector path with a 0-pixel feather. Or the result will look unrealistic.
Maintain a subtle feather ranging from 0.2 to 0.5 pixels. It will ensure a realistic and natural blending with the surrounding elements.
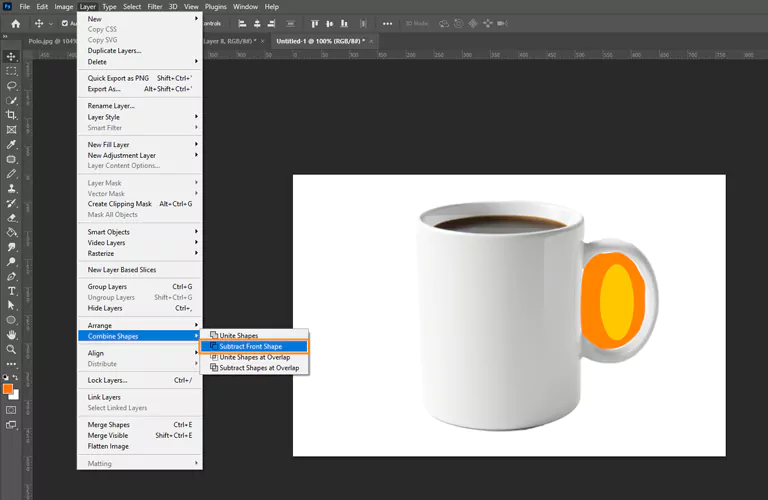
05. Use Subtract Front Shape for Hole Objects
How do you draw clipping paths for images with holes, like a teapot with an open handle, a donut, or a bracelet? There are some deviations around the path outline. You need a compound clipping path to combine multiple paths into a single one.
- First, create a clipping path for the outer area of the object.
- Select Layer > Combine Shapes > Subtract Front Shape.
- Now, create a clipping path for the inner hole. The system will automatically combine the paths into a single path.
06. Combine Paths with Layer Masks
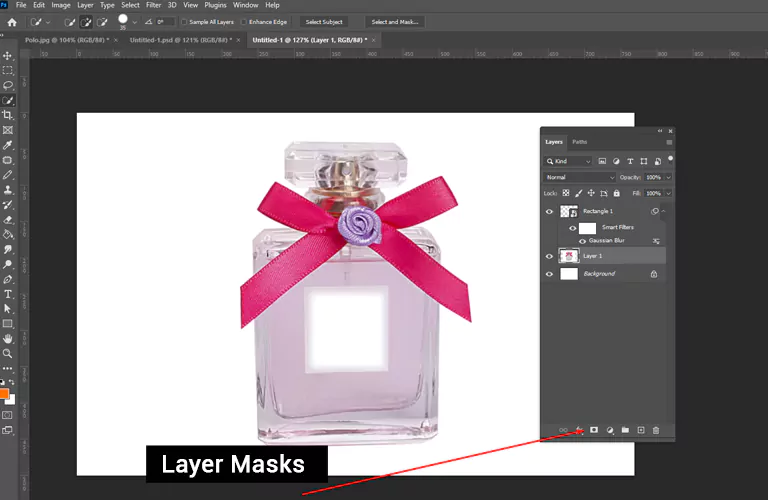
Imagine a perfume bottle with a ribbon. The bottle edges are sharp, but ribbon edges are soft and curved. In such cases, you have to combine the layer masking technique with clipping paths.
- Target the hard-edged area and draw a hand-drawn vector path.
- Right-click on the path and choose the “Make Selection” option.
- Select the “Add layer mask” option from the bottom section of the Layers panel.
- Target the soft-edged areas while keeping the mask active.
- Choose a soft-edged brush from the Brushes panel to paint the soft details.
07. Save Complex Selections as Channels
Creating clipping paths on objects like bike wheels is not simple. The thin, curved spokes must be handled cautiously for perfect isolation.
One of the best solutions is to save each selection to use later. You won’t have to recreate them again.
- After drawing your preferred clipping path, right-click on the path from the Paths panel and choose the “Make Selection” option.
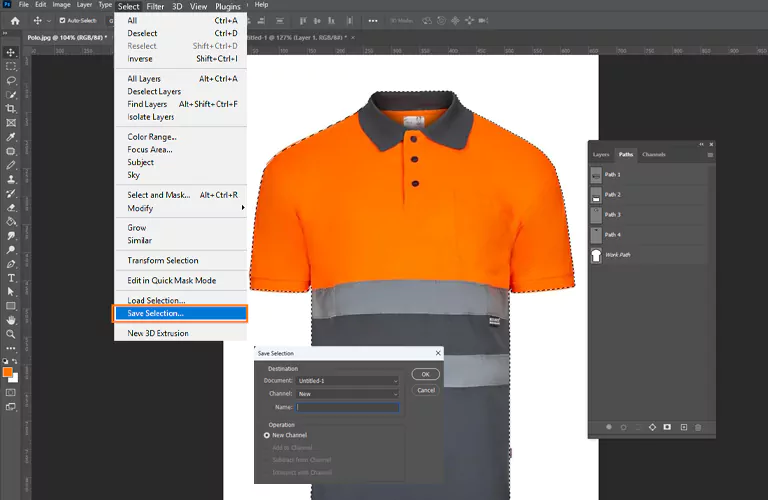
- Tap on the selection area and choose Select > Save Selection to create a new channel named Alpha 1. It will preserve the clipping path as a selection.
- If you want to reuse the selection again, double-click on Alpha 1 on that channel’s thumbnail.
08. Layer and Path Management
Does your image have multiple complex elements? If so, you need to use multiple clipping path techniques.
For each vector path, add a clear, concise, and object-specific name. This will help you manage and identify different paths easily without any confusion.
09. Shortcuts and Workflow Efficiency
Keyword shortcuts can significantly speed your workflow. You can switch between tools and functions instantly. It also enables you to create more accurate clipping paths.
| Specification | Shortcut Key |
| Pen Tool | P |
| Direct Selection Tool | A |
| Zoom In | Ctrl /Cmd+ |
| Zoom Out | Ctrl /Cmd- |
| New Layer Creation | Shift + Ctrl/Cmd + N |
| Path Deselection | Ctrl/Cmd + D |
| Path Duplication | Alt/Option + Drag path |
| Path Point Manipulation | Alt/Option + Click |
| Paths to Selections Conversion | Ctrl + Enter or Cmd + Return |
| Clipping Mask Creation | Ctrl + Alt + G or Cmd + Option + G |
FAQs
What is the best Photoshop tool for creating clipping paths?
The Pen tool is the best Photoshop tool for creating pixel-perfect, hand-drawn clipping paths. You will get better results for images with complex shapes and detailed edges.
When is a clipping path not effective to use?
Objects with soft, undefined, or transparent edges are not suitable for clipping paths. Layer masking is a better choice for such objects, like smoke, fur, hair, etc. It does not leave any unnatural hard line.
Should I remove or adjust incorrect anchor points?
Adjust the anchor points using the Direct Selection Tool to save time and create more accurate clipping paths.
How to close a clipping path to complete a shape?
Simply take back the pen tool where you have created the first anchor point. Click on the tiny circle icon to close the path.
How do you create clipping paths for thin elements like wires or spokes?
First, zoom in on the element to 200% to 300%. Now, trace over it using the pen tool carefully to create precise outlines.
Final Words
Clipping path is a popular image editing technique used for various types of product images. We have already discussed some practical tricks and tips while clipping path on images. Whether you are editing photos for your ecommerce, publishing, or healthcare projects, our useful tips will help you get cleaner cutouts and smoother edits. Remember, practice is the key to achieving edge-accurate cutout. Continuously uplift your clipping path skills. Don’t you have time for handling the post-production? Outsource a professional clipping path service provider to attain top-notch results that will empower your business.

