How to do deep etching in Photoshop professionally depends largely on how comfortable you are with the editing tools manually. What you sharpen here is more important than how precisely you sharpen.
From ecommerce product listings to apparel composites, whatever your purpose is, you need to pay attention to proper path-based selections. Keep scrolling, this complete guide will take you on the pro-level path to create deep etched images.
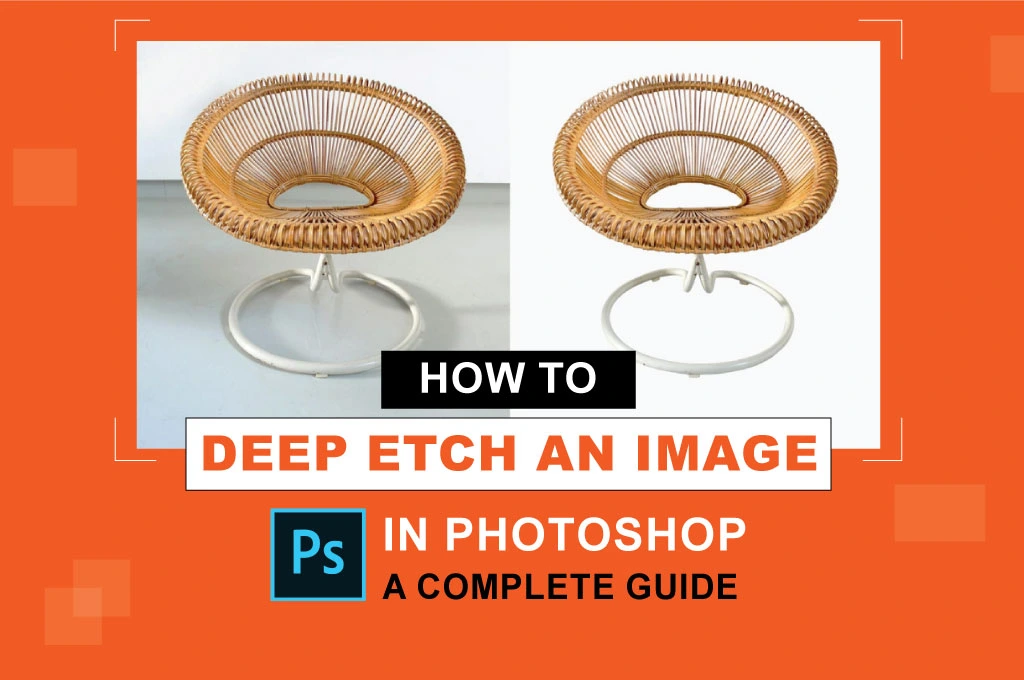
What is Deep Etching?
Deep etching is used in image editing to remove the background from a photograph or image. It involves carefully selecting the image’s subject and separating it from the ground by “cutting out” the issue using various tools and techniques.
This can be done manually using tools such as the pen tool in Adobe Photoshop, or it can be done automatically using artificial intelligence software to identify the subject and separate it from the background. Once the issue has been isolated, it can be placed on a new location or transparent layer, allowing it to be used in various creative applications.
Deep Etching vs Masking?
One key difference between deep etching and masking is the required level of precision and detail. Deep etching typically involves a more precise selection of the subject. It can be time-consuming, especially if the issue has complex shapes or fine details that need to be preserved.
Masking, on the other hand, is a faster technique that can be used to separate subjects with simpler shapes or fewer details.
Another difference between deep etching and masking is the tools and techniques used. A deep etching service often involves using the pen tool in image editing software such as Photoshop to manually trace around the subject and create a path that can be used to cut it out.
Masking, on the other hand, typically involves using various selection tools and masks to define the subject and separate it from the background.
How to Deep Etch an Image in Photoshop?
Step 1: Open the subject image in PS

Open the image you need to deep etch in Photoshop. If you are working with a high-resolution image, resize it to a smaller size to make the deep etching process more manageable. To do this, open the “Image” menu and select “Image Size.” From the “Image Size” dialog box, enter a new width and height for the image and click “OK.”
Step 2: Choose the pen tool

Next, select the pen tool from the toolbar. A pen tool is powerful and allows you to create precise paths around the image’s subject. To choose the pen tool, click and hold on to the lasso tool in the toolbar and select the pen tool from the flyout menu.
Step 3: Outline the image’s primary topic
With the pen tool selected, carefully trace around the image’s subject, creating a path that defines the subject’s outline. Be sure to include any delicate details or complex shapes in the way. To create a course, click on points around the design of the subject and drag the pen tool to create curved segments. When you are finished tracing around the issue, click on the first point you made to close the path.
Step 4: Make a selection from the path.
Once you have completed the path, right-click on it and choose “Make Selection” from the context menu. Set the feather radius to 0 pixels and choose “OK” in the “Make Selection” dialog box. This will create a selection around the subject of the image.
Step 5: Invert the selection

Go to the “Pick” menu and choose “Inverse” with the selection selected. This will invert the selection, selecting everything except the image’s subject.
Step 6: Remove the background
Press the delete key to remove the background from the image. The subject of the image should now be isolated on its layer.
Step 7: Add a new background (optional)
If desired, you can add a new background to the image by creating a new layer and placing it underneath the layer containing the subject. Select “New Layer” from the “Layer” menu to add a new layer. Drag the new layer in the layers panel under the subject layer to make it the active layer.
Step 8: Save the image
When deep etching the image, save it in the desired file format. To keep the image, go to the “File” menu and choose “Save As.” Choose a file type and name for the picture in the “Save As” dialog box, then click “Save.”
Benefits of Photoshop deep etching
There are several benefits to using deep etching in Adobe Photoshop:
Greater control over the final image
Deep etching allows you to carefully select and isolate the subject of an image, giving you greater control over how it appears in the final print. This is especially useful when placing the issue on a new background or using it in a composite image.
Improved image quality
Removing the background from an image can eliminate any distracting elements present in the original image. This may aid in enhancing the image’s overall quality and clarity.
Flexibility
Once the subject has been isolated using deep etching, it can be placed on a new background or transparent layer, allowing you to use it in various creative applications.
Professional results
Deep etching is a professional image-editing technique that can produce high-quality results. It is often used in commercial photography and graphic design to create professional-looking images.
Time-saving
While deep etching can be time-consuming, it can also save time in the long run by allowing you to create multiple versions of an image with different backgrounds or compositions rather than having to retake the photo each time.
FAQ about How to Do Deep Etching in Photoshop
Now that you know about deep etching techniques in Photoshop, you might have some questions in mind.
1. How do I make a suitable etch?
To make a good deep etching in Photoshop, start by carefully tracing around the subject of the image using the pen tool. Next, create a selection from the path and invert it to select everything except the subject. Finally, delete the background and add a new layer if desired before saving the image in the desired format.
2. How do I create clean borders in Photoshop?
Using the pen tool, carefully build a path around the image’s subject in Photoshop to get sharp edges. Next, make a selection from the path and invert it to select everything except the subject. If the selection has any sharp edges, you may alter it by selecting “Refine Edge.” Finally, use the “Feather” option to soften the edges of the selection if desired, and then delete the background to create the final image.
3. How can I clean up a cluttered backdrop in Photoshop?
To get rid of a messy background in Photoshop, use the pen tool or a selection tool such as the lasso or magic wand to carefully select the subject of the image. Next, use the “Refine Edge” command to smooth out any rough edges and fine-tune the selection. Finally, click the delete option to clear the background and create a new layer or add a unique background if desired.
4. Which tool is most commonly used for deep etching?
The Pen Tool (P) is the primary tool used. It allows you to create “Bézier curves”, which can be adjusted with extreme precision to follow the exact silhouette of a product or model.
5. What is the difference between deep etching and masking?
Deep etching is a “destructive” or path-based process focused on a hard cutout, often resulting in a vector path. Masking is “non-destructive”, allowing you to hide or reveal parts of a layer using brushes, which is better for soft edges like fur or hair.
Similar Reads for You
-
Everything You Need To Know About Free Download Of Photoshop
-
How to Use Pen Tool in Photoshop for Product Photography
Final thoughts
How to be professional with deep etching in Photoshop is all about how proficiently you use the Pen Tool. Where masking isolates simple shapes, deep etching dominates complex shapes.
While AI tools can work at volume levels, they cannot work on fine edges flawlessly, where a deep etching service excels successfully for its human retouchers. And here comes the question of skills, which you can achieve in no time by following the steps outlined in this guide