You are building a presentation for a big meeting tomorrow morning. You find the absolute perfect product photo, but it has an ugly, distracting gray square behind it. It completely ruins the look of your slide deck.
All you planned was to just show the object aligned with your research findings without any backdrop. Now you feel that how much important it is to know how to remove background from picture in Google Slides.
Once you make the photo free from distractions, you’ll be able to use it on your different slides (even all of them) in no time. This article is going to help you achieve this goal as a quick guide for all your upcoming presentations.
Before Starting, Here’s the Thing You Should Know
Right at the very beginning, you should know about Workspace Experiments, which accommodates Google’s other products, like Gmail, Docs, and even Slides.
Yes, just like the regular Google products that you’re already used to.
Then why am I mentioning it separately? The reason is that there are some important differences between the two, and they apply to Slides as well.
Bluntly speaking, you need to pay to use Google’s Workspace, but Workspace Experiments lets you try out Workspace’s AI-led features for free. And one of these is the very Remove Background, which you’ll get through Gemini.
To enjoy this benefit, you can use your existing Gmail ID that you have long been using. Everything will seem the same while working, but the difference will start to unfold in front of you when you go to touch those AI things.
For example, in regular Google Slides, you won’t find the ‘Edit image’, ‘Help me visualize’, and ‘Remove background’ options anywhere, which are very easily visible in the Workspace Experiment’s Slides.
How to Remove Background from Picture in Google Slides
If you go beyond your traditional slides and enter this experimental one, you’ll see that it’s letting you remove the background from your pictures in a variety of ways.
Whichever way you choose, first you’ll need to sign in. If you haven’t already, you can start here and then proceed to the following steps:
Upload Your Image

You’re already on the slide in your presentation where you need the image with the object on a transparent background, right? Okay, so now it’s your turn to bring your intended image here.
Go along with the following way:
Insert → Image
It will show you all the possible sources Slides is providing you for importing images.
Click to Remove Background from Image
Here you can actually remove the backdrop of this image in two ways. The first is directly, and the second is indirectly, but both are the result of AI.
Direct and Fastest Way

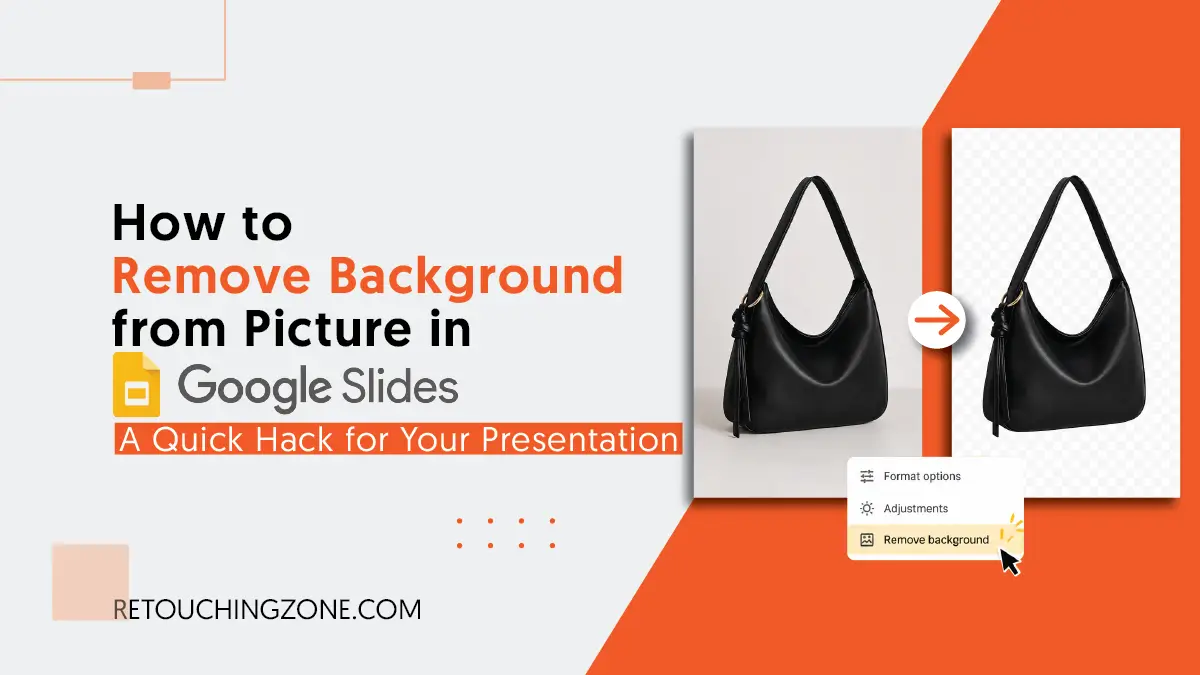
Click on the image. You can see a horizontally wide, edge-rounded box below the bottom border line of the image, right?
In this box, just to the right of ‘Edit image’, click on the ‘people face with broken diagonal lines behind’ icon, and the background of your image will instantly disappear.

You can take the alternative route where you have to right-click on the picture and go down to click on Remove background.

You can get the same result by following the pathway below (Just make sure you have your photo selected):
Format → Image → Remove background
Prompt for Background Removal

Didn’t you get the ‘Edit image’ option in the box below after clicking on the image a while ago? This time, click on that, and you will see a panel titled ‘Help me visualize’ open on the right side of the slide.
At the lower part of the panel, there will be a chatbox that has a miniature of your very image. You simply need to write ‘remove background’ into the box, and then your image will be without the background.

You can also right-click on the image and then click ‘Edit Image’ on the way down to get the same result.

If you want a manual way to get this result, you can go like this (If you don’t select the image, you won’t have access to this path):
Format → Image → Edit image
Frequently Asked Questions
1. Can I use Google Slides to export images that have a transparent background?
No, Google Slides doesn’t export just an image with a transparent background. You’ll need to download the entire slide here to get the image you want, even if you choose to save the file as a PNG.
2. Can I get the image with intact quality while editing it in Slides?
When you edit an image, like changing background of your photo, sometimes image quality can become worse. Just cropping it may not make much difference, but if your image is small enough and you drag it to enlarge it, it will become quite blurry.
3. How to remove background from photo in Google Slides on Chromebook?
Like PCs and MacBooks, you’ll need to follow the same procedure on Chromebooks when you go to make your image background transparent in Google Slides. And it’s so easy that when you click on the image, you’ll find a ‘Remove background’ icon in a box below it. Then the faster you click on it, the faster you get your backdrop-free image right.
4. Can I work with SVG files in Google Slides?
You can’t upload vector SVG files directly to Google Slides. To do this step, you first should change the SVG file into a PNG format. After that, you can bring it in.
5. What is the maximum size of an image I can upload to Google Slides?
You can upload a single image up to 50 MB in size to Google Slides. However, keep in mind that very large files can slow down your presentation design.
Takeaway: What if the Background is too Complex
Knowing how to remove an image background in Google Slides means your presentation is going to leave your audience wow. But there is a big but regarding the type of picture you are working on.
The thing you need to keep in mind is that if you upload a photo of low quality, you will have to worry about its post-editing results. After all, there is AI in action here for transparent backdrops; it may not be reliable in all cases, especially for complex ones.
Flat edges and altering colors of the object can have a negative impact on the entire image. And here comes the turn to resort to direct human editing.
If you are worried about restoring the original quality of your photos, then Retouching Zone is right there for you. An industry-leading background removal service provider who’ve long been in the industry serving just the solution.
Give their free trial a go, then see their results and decide for yourself for your presentation design.