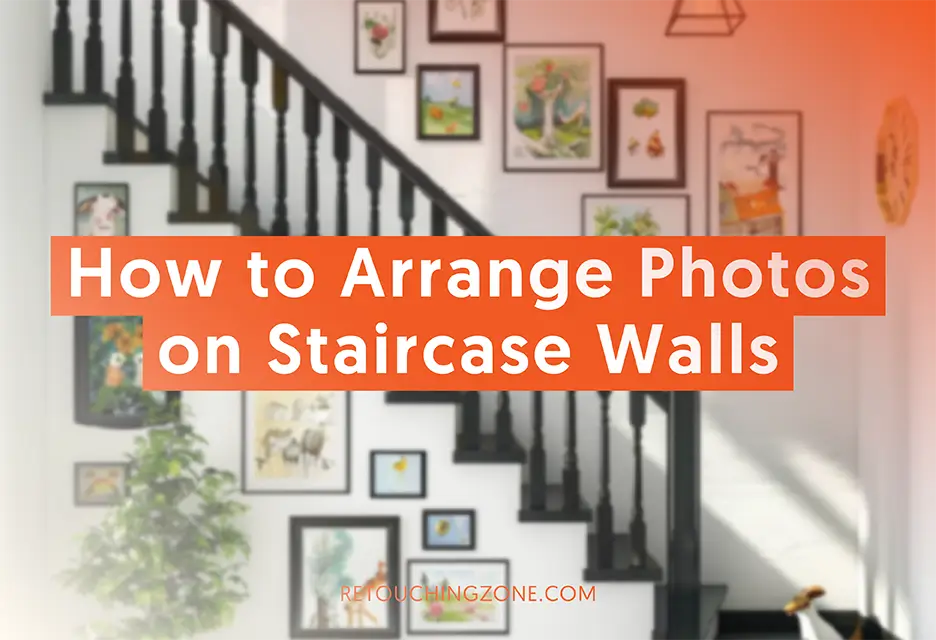
Do you know exactly under what circumstances it becomes imperative for you to know how to arrange photos on staircase walls? That is, the more art lover you are or the more you want your way up the stairs to be aesthetic than others.
Decorating with pictures on stairs comes with proper planning regarding wall space, its layout, and photo frames. This preparation requires more than just your deep creative eye, but also some knowledge of structural techniques.
This pro guide will walk you through the proven ways so that you can understand exactly what you need to do to create your desired ascending gallery.
TL;DR:
- Spotlight on the best staircase gallery wall formula to DIY yours from scratch
- Giving some great staircase wall decorating ideas to give your gallery an artistic look
Quick Overview: How to Decorate a Stairway with Photos
| Core Step | Activities | What to Consider |
| Pre-arrangement | Wall Space Measurement |
|
| Picking Photo Frames |
|
|
| Layout Plan |
|
|
| Prepare the Wall |
|
|
| Decoration Starts | Hanging the Pictures |
|
| Post-arrangement | Check and Balance | Ensure everything is aligned and visually balanced as planned. |
How to Arrange Photos on Staircase Walls DIY Breakdown
From the above table, you surely get a clear scenario that a sophisticated plan is needed to conduct this process, right? So let’s dive deeper into each of the core steps and see what the nature of the activities is and how influential the parameters are.
Measure how much wall space you have

When the work involves the wall adjacent to the staircase, it is most logical to calculate its circumference. This calculation also includes checking the condition of the wall. And this is where planning comes into play when you focus on how to create a gallery wall on a staircase.
It is important to consider the beginning and end of the staircase as it heavily contributes to the alignment of the layout. Also, you definitely don’t want the plaster to start peeling off as soon as you hammer a nail into the wall.
Find the right photo frames: Size and color
What are the best photo frame sizes for arranging pictures on staircase walls?
Quite a pricey question when it comes to hanging pictures.
Staircase gallery wall frames 8×10 inches or smaller will look like they’re jamming the entire wall. If the pictures on them are all bright or dark colors, they’ll take up the entire display! Try picture frames in sizes 11×14 and 20×24 instead.
Along with choosing a matching frame, you also need to consider the color.
- Pay attention to the colors on your stairs and walls. If the contrast of the frames is appropriate with these, the whole design will be eye-catching.
- Use matte photos, which will add unique artistry to each frame and give a better dimension to the entire template on the wall.
Now, wouldn’t a bunch of different frames and pictures together look chaotic? That aside, how to arrange a stairway gallery wall stylishly? Here’s the solution below:
- Choose gold tones, black, wood, or white, and make each frame look cohesive. Use consistent mattes to tackle excessive variation in each image.
- Change the picture frames at each step of the staircase (e.g., landscape to portrait), group similar frames together at each step (e.g., portraits together).
- You can even contrast images by content. For example, family portraits with travel prints, then textured prints, simple sketches, or even quotes.
Come up with a suitable layout

Once you’ve chosen your frames, carefully place them on the floor. It’s not time to hang them on the wall yet. You’ll need to have an imaginary style in your brain for a demo. Here are some basic staircase gallery wall layout ideas for your brainstorming.
- Grid (basically a symmetrical grid layout): Good for picture frames of the same size.
- Salon: Great for a mix of different frame sizes and styles (like a collage).
- Diagonal: This also works best for different frame sizes, as it hangs at an angle to each step of the staircase. However, it depends on whether you’re already good at eyeing how to hang pictures diagonally.
A deeper look at a different perspective for the best staircase wall gallery template:

Prepare the wall

Mark the locations of the picture frames for each stair and accordingly with scotch tape. Make sure that there is a gap of about 2-3 inches between the frames. When hanging the lowest picture, make sure that its center is at eye level, which is usually around 57-60 inches above the stair step.
At this stage, many people get confused about how to arrange photos on staircase walls without nails. For this, you can use command hanging strips and adhesive hooks for slightly heavier frames.
Another way is to use kraft paper, where you have to hold the paper on the frame and cut the paper along the outline of the frame. Then, hang the cut pieces on the wall as you need with scotch tape, which can be removed later.
Hang pictures cautiously

Getting to this stage means you’re done with all your preparations. So are you ready with hooks, anchors, and command strips? Because now it’s your turn to learn how to hang photos on a stair wall.
Pro tip: If you have a wall to paint, use command strips to hang the pictures without using any pins or nails. Because this method is not limited to planning only, these days, many people create wall photo galleries with command strips.
Post arrangement check and balance

When you’re an art lover, you’re also a perfectionist, so you can’t just walk away with the pictures hanging. Of course, this is true for everyone considering staircase galleries, whether they’re DIY or not.
Take a moment to look at your newly created gallery and go up and down the stairs.
- How does everything look?
- Is there too much or too little space between the frames?
- Is the alignment with the steps and the adjacent picture frames correct?
Continue the check and balance process until the answers to all of these questions are a big “Yes”. Feel free to use existing large and small photo frames strategically to create balance.
Frequently Asked Questions about Decorating Staircase Walls
-
How to arrange photos on staircase walls with professional framing options?
Professional framing means that when you place the picture frames, considering the angular aspect of the stairs, you do it in a way that does not disrupt the alignment of the entire gallery (both the frame with the stair step and between the two photo frames).
Also, the collection of pictures should not seem too busy, i.e., your gallery should have some considerable space to breathe.
-
Where to hang pictures on a staircase?
Regardless of the size of your photo, the center of the photo should be at your eye level, which is ideally around 57 to 60 inches from the stair tread floor.
-
Can I mix different frame styles on a staircase wall?
You can blend the frame’s color, size, material, and even the content (i.e., family, travel photos) of the picture to arrange photos on a staircase wall. All you need to take care of is that the mixer goes with the entire environment, which means the stairs and background wall, and importantly, the alignment remains intact.
-
How many pictures should you have on your walls?
It really depends entirely on your wall space, the dimensions of the stairs, and your personality (preferences). No matter how many you set up, it’s best to have them between the starting and ending step borders of the stairs.
-
What is the 2/3 rule for hanging pictures?
The 2/3 rule is that your image should be about two-thirds the width of the wall or furniture. Specifically, in the case of stairs, you should fill about two-thirds of the length along the diagonal run, while keeping the centerline constant to maintain balance.
Wrapping Up
This systematic breakdown covers best practices to help you master how to arrange photos on staircase walls. The staircase photo gallery ideas shared are tailored enough to suit your unique preferences, and all you have to do is try any of them.
Keep in mind the fundamentals-
Symmetrical grid layout works for picture frames of the same size.
Salon and Diagonal take on versatile frame size and style combinations.
Don’t forget to leave about 2-3 inches of space between frames and keep the center of the photo at eye level from the floor. Overall, feel free to let your creativity flow while maintaining the beauty and balance of the gallery.