When you think of jewelry, what comes to mind? Diamonds? Metal? Strings? Not so much, probably. But that’s exactly what jewelry designers and jewelers work with when creating pieces using photoshop.
In this blog post, we will look at the basics of jewelry design using photoshop and show you how to create beautiful pieces using just a few tools. From simple earrings to intricate necklaces, the possibilities are endless. So get creative, and let us help you create something truly unique.
What Is Photoshop Jewelry Editing?
Since the days of basic photo editing, Photoshop has been used to modify images. However, jewelry is a rare image that can be successfully edited with Photoshop. There are a few reasons why this type of image can be edited with Photoshop.
- First, many jewelry pieces include small details that can be accentuated or removed without affecting the original design.
- Second, some unique patterns and shapes can be reproduced perfectly with the help of Photoshop’s tools.
- Finally, jewelry requires great care and attention to detail, so it can often benefit from certain enhancements such as shine and clarity.
Whether you’re looking to edit a single piece of jewelry or merge multiple pieces into one cohesive design, Adobe Photoshop is an ideal tool.
Read more : E-commerce Image Editing Services
The Different Types of Photoshop Jewelry Editing
Many different types of jewelry can be edited in Photoshop, and the following tutorials will show you some of the most common techniques.
-
Cropping and Straightening Images of Jewelry
Keeping the piece’s proportions in mind when cropping or straightening jewelry images is important. For example, if a necklace is too long or short, you may need to crop it accordingly. You can also use the curve tool to add more curves to an image to give it a more natural look.
-
Adjusting Backgrounds and Colors
If your jewelry doesn’t have a solid background, you may need to adjust the colors before editing. To do this, select the area you want to change and use the colors palette to edit the colors. You can also use filters, such as shadows and highlights, to create a more dramatic effect.
-
Adding Textures and Patterns
Adding textures and patterns is another common technique for altering jewelry images. To do this, you’ll need to prepare your image by cropping it if necessary. Then, using tools like the clone tool or pattern blend mode, you can create copies of specific areas of the image and apply different textures or patterns to theirs.
The Different Elements Of Jewelry Retouching
Many different elements go into jewelry retouching, and each can significantly impact the final product. If you’re new to the process, here’s a quick guide to some of the most important ones:
-
Backgrounds
A good background can make or break an image of jewelry, so it’s important to choose one that suits your subject matter and accentuates the jewelry instead of overpowering it. Various options are available, from plain backgrounds to busy patterns or textures.
-
Lighting
Jewelry images often need a boost in brightness and contrast to look their best. Useful lighting sources include direct sunlight or artificial light like lamps or torches. Shadows can also be exaggerated for more dramatic results.
-
Colours
Jewelry is made of different colors and shades, so it’s important to consider that when editing images. Try to use complementary tones (colors that sit opposite one another on the color wheel) to create more dynamic effects. For example, a blue tone against a green background will create an effect reminiscent of ocean waves.
-
Lines and textures
Jewelry tends to be delicate and intricate, so it’s important not to overdo it with sharp lines or rough textures. Instead, use soft edges and subtle details to give your image more depth and realism.
How to do Photoshop Jewelry Editing
If you’re looking to create jewelry with Photoshop, you can use several techniques to edit your design elements. You can adjust colors, add textures and details, and even change the shape or color of individual pieces. This tutorial will show you how to edit Jewelry in Photoshop using basic steps.
- Open the image that you want to edit in Photoshop.
- Select all elements you want to modify by pressing “A” (or clicking on each object with your mouse).
- Click on Photoshop’s “Image” tab and select “Adjustments.”
- In the Adjustments panel, click the “Color” button and choose a new color for your jewelry design. You can also adjust other settings in this panel, such as brightness and contrast.
- Click the “Texture” button and choose an appropriate texture for your jewelry design. You can also adjust other settings in this panel, such as height and width.
- Click on the “Shape” button and choose a new shape for your jewelry design. You can also adjust other settings in this panel, such as position and size.
What Are The Best Jewelry Editing Tools?
There are many different jewelry editing tools that you can use to alter the appearance of your photos. Below, we’ve compiled a list of some of the best ones, along with a few tips on how to use them.
- Adobe Photoshop: This is the most common jewelry editing software and has various features for altering images. You can use filters, layers, and channels to adjust colors and tones and resize and move images around.
- GIMP: GIMP is a free image editor popular for its simplicity. It has fewer features than Photoshop, but it does have some basic tools for adjusting colors and brightness levels.
- Inkscape: Inkscape is an open-source vector graphics program that can be used to create jewelry designs. It has features for creating outlines and curves, as well as for adding text or symbols.
- PhotoShop: If you’re more familiar with photo editing software like Photoshop or GIMP, PhotoShop may be a better option. It has more features than either of those programs, but it can also be difficult to learn if you’re not used to it.
- Facetune: This app is available on iOS and Android devices and makes it easy to adjust color throughout your photo without editing each pixel individually.
How Jewelry Retouching Is Beneficial.
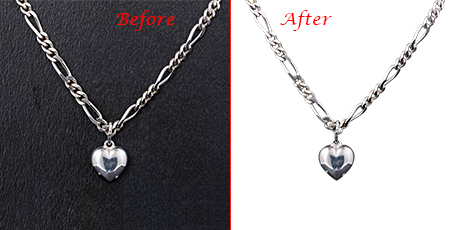
Jewelry retouching in photoshop is a process that can be used to improve the appearance of jewelry images. Photographers can create more polished and professional images by correcting common flaws, such as dirt and scratches.
Retouching can also help to improve the composition of jewelry images by removing unwanted elements or improving the alignment of elements within the image. Photographers can create more consistent images with the original design by adjusting colors and brightness.
Lastly, retouching can help to fix errors in jeweler’s marks or engraving. By correcting these mistakes, photographers can create images closer to the original’s specifications.
Pros and Cons of Photoshop Jewelry Editing
If you’re looking to make minor adjustments to your jewelry design in Photoshop, there are pros and cons to consider. Here are the top pros and cons of editing jewelry in Adobe Photoshop:
Pros:
- Editing jewelry in Photoshop is a quick and easy way to improve your design.
- You can make small adjustments to your design without needing to redo the entire piece.
- You can use different effects and filters to give your jewelry a unique look.
- It can save your edited designs as PNG files for easy sharing.
Cons:
- Expect to spend some time editing your jewelry designs in Photoshop if you want them to look their best. Some text or elements on your design may not be editable, meaning you’ll need to redo them if you want them altered.
Conclusion
Photoshop Jewelry Editing is necessary for anyone who wants to create beautiful jewelry. By editing photos and creating intricate designs, you can make any piece of jewelry look like a traditional masterpiece. With the right tools, you can create stunningly beautiful pieces that are sure to turn heads.